| INTRO | IRIDIUM FLARES | STAR TRAILS | ISS | SUN ANALEMMA | LINKS | GALLERY | BACK TO ESCRITURES |
INTRODUCTION
Astro Photography can be a fascinating hobby. There is no need for special equipment: a camera,
a steady tripod, a precise time piece, an intervalometer are all that is needed to get started, plus a lot of patience.
1. IRIDIUM FLARES
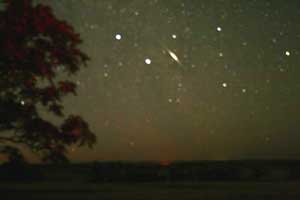
The Iridium Flares are made by the reflection of the Sun on the photocells and antennas of the Iridium satellites. They are only visible when
the Sun is just below the horizon. To the naked eye their appear like a brilliant flash that comes and goes briefly but on the long exposure
photographs one can see the trajectory of the satellites.
The best predictions of the flares are on this excellent Web Site:
www.heavens-above.com
The number of opportunities to watch and photograph the Iridium Flares is limited and is also influenced by the weather and the position of the moon.
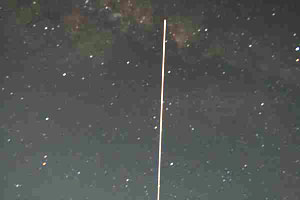
The passage of the International Space Station can be seen and can be photographed. It will look like a line amongst the background of the stars. It is the brightest of the other man-made satellites. Predictions are available on :
www.heavens-above.com

Star Trails are probably the most beautiful night photographs. They can be taken with both film and digital cameras.
3.1. Film cameras
3.2. Digital cameras
3.1. Start Trails with film cameras.
This is probably the simplest way: Just position the camera on a steady tripod and open the shutter on 'B'. The film can be colour or black and white and tests will be needed to find the right aperture considering the ISO rating of the film.
Very long exposures will run the risk of shaking and of 'reciprocity failure' with colour film; digital cameras do not have the problem of 'reciprocity failure but have the problem of "noise" on very long exposures. A series of tests need to be done to find the right aperture and how much 'reciprocity failure' can be tolerated.
3.2. Star Trails with digital cameras.
Digital cameras can also be used for star trails. There are two ways of using them:
3.2.1. with a long exposure.
3.2.2. with multiple exposures and 'stacking' those multiple exposures.
3.2.1. Long exposure. The process is the same as with a film camera but now, instead of the 'reciprocity failure' of the co lour films we are faced with 'noise' where pixels that should stay become visible. Some modern cameras have a function called 'noise reduction'. It has the great inconvenient of requiring extra time for the camera to 'remove' those visible pixels. It may be good to try first with the 'noise reduction' switched to 'OFF'.
Example of exposures: ISO= 400, time = 15 minutes:
The same spot with 25 exposures of 5 minutes stacked as one picture.Here
3.2.2. Multiple exposures. Another way is to take multiple exposures (sometimes hundreds of them) and to 'stack' them in post-processing. This has another advantage is that we can remove some unwanted frames before the 'stacking' is done. Several programs can do that rather easily:
www.startrails.de
www.markus-enzweiler.de/software/software.html
Examples of Star Trail Stacking here.

4.1. Sun Dial
4.2. Film camera
4.3. Digital camera
4.4. Software


Iridium flare close to α and β Centauri
(Southern hemisphere).
October 26, 2012
(Southern hemisphere).
October 26, 2012
The best predictions of the flares are on this excellent Web Site:
www.heavens-above.com
The number of opportunities to watch and photograph the Iridium Flares is limited and is also influenced by the weather and the position of the moon.
2. INTERNATIONAL SPACE STATION
The passage of the International Space Station can be seen and can be photographed. It will look like a line amongst the background of the stars. It is the brightest of the other man-made satellites. Predictions are available on :
www.heavens-above.com

The International Space Station passing overhead.
September 25, 2010
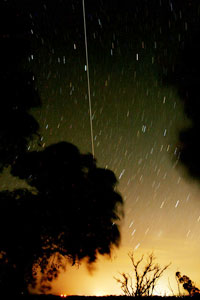
The ISS, facing West.
November 23, 2013
September 25, 2010

The ISS, facing West.
November 23, 2013
3. STAR TRAILS
Star Trails are probably the most beautiful night photographs. They can be taken with both film and digital cameras.
3.1. Film cameras
3.2. Digital cameras
3.1. Start Trails with film cameras.
This is probably the simplest way: Just position the camera on a steady tripod and open the shutter on 'B'. The film can be colour or black and white and tests will be needed to find the right aperture considering the ISO rating of the film.
Very long exposures will run the risk of shaking and of 'reciprocity failure' with colour film; digital cameras do not have the problem of 'reciprocity failure but have the problem of "noise" on very long exposures. A series of tests need to be done to find the right aperture and how much 'reciprocity failure' can be tolerated.
3.2. Star Trails with digital cameras.
Digital cameras can also be used for star trails. There are two ways of using them:
3.2.1. with a long exposure.
3.2.2. with multiple exposures and 'stacking' those multiple exposures.
3.2.1. Long exposure. The process is the same as with a film camera but now, instead of the 'reciprocity failure' of the co lour films we are faced with 'noise' where pixels that should stay become visible. Some modern cameras have a function called 'noise reduction'. It has the great inconvenient of requiring extra time for the camera to 'remove' those visible pixels. It may be good to try first with the 'noise reduction' switched to 'OFF'.
Example of exposures: ISO= 400, time = 15 minutes:
 |
 |
 |
| f: 5.6 | f: 8 | f:11 |
The same spot with 25 exposures of 5 minutes stacked as one picture.Here
3.2.2. Multiple exposures. Another way is to take multiple exposures (sometimes hundreds of them) and to 'stack' them in post-processing. This has another advantage is that we can remove some unwanted frames before the 'stacking' is done. Several programs can do that rather easily:
www.startrails.de
www.markus-enzweiler.de/software/software.html
Examples of Star Trail Stacking here.
4. SUN ANALEMMA
4.1. Sun Dial
4.2. Film camera
4.3. Digital camera
4.4. Software
The Analemma is the representation of the position of the Sun as seen through the year at the same time.
It looks like a '8'
figure. This is due to the difference between 'Sun Time' and 'Clock Time'. That difference well known to astronomers and navigators is
called the 'Equation of Time', with a maximum of about 18 minutes in April and November, and is zero in April, June,
September and January.
A search on Google and on Wikipedia will bring a mass of useful information.
4.1. Sun Dial
The easiest way to materialize the Analemma is with a sun dial, although it is not a truly photographic method, marking the end of the shadow of a stall (gnomon) at the same time through the year. The markings do not have to be at regular intervals as long as they can be linked by a curve.
.
With the Sun dial oriented North-South, the Analemma should be centered on the board. Depending of the longitude of the observation place, one has to calculate the time where the observation must be made. Indeed, within a time zone, all clocks should show the same time, but the 'Sun Time' or Local Mean Time (LMT) will be different at each longitude.
To get the LMT of a place one must know its longitude. For every 1° one is West of the time zone 'standard longitude', add 4 minutes to LMT to get the standard time. For each 1° East subtract 4 minutes.
The 'zone's standard longitude' is most of the times at the center of the time zone. It can be found on a map on this Site: http://www.worldtimezone.com/
Here is an example of LMT calculation. My longitude is E116°40', the longitude of my time zone (Zone 'Hotel':UTC+8) is E120°.
The difference between the 2 longitudes is:
120°- 116°40' = 3°20'
3° x 4 = 12 minutes
20' x 4 = 80 seconds = 1 minute 20 seconds
Difference = 13 minutes 20 seconds
As my East longitude is West of the standard meridian, I must ADD the difference to the 'Clock' time, therefore to take a picture of the sun at 12 noon (sun time, LMT) the clock should show 12:13:30
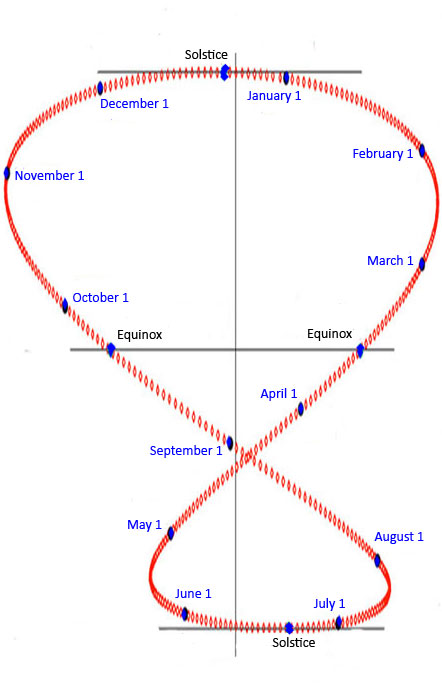
Plotting the Sun Analemma with dates around the year (Southern Hemisphere). The horizontal scale is much enlarged. Using this plotting, one can position separate photos along the year. The Equinoxes fall around March 20 and September 20 -22 and the Solstices around June 20-21 and December 21-22 depending of the years.
More details on Wikipedia.

4.2. Film camera
The first photograph of the sun Analemma is attributed to Dennis di Cicco in 1978-1979. The picture was first published in the June 1979 issue of the magazine Sky & Telescope. Since, the legend says that more explorers have walked on the Moon than photographers have succeeded in photographing a full sun Analemma. And also that no one has succeeded in less than 3 years... I must say this is my third year, and probably my final year with a film camera, having finally discovered the advantages of using digital cameras.
It must also be said here that some pictures of sun Analemmas are almost 'too perfect', without any 'misses' and in a perfect shape. It is impossible to imagine that through a full year there will not be some days when the sky is so overcast that the sun is invisible... Also, some Analemmas are shown on some landscape, showing that the pictures had been 'photoshoped' or 'doctored'. As the images of the sun have to be taken with a very dark filter, no sign of any landscape should appear on the final photo unless it is 'added'. To which extend such 'doctoring' should be considered?
A search on Google will show these Analemmas and more.
A rather 'easy' way to photograph the Sun Analemma is to use a film camera. The choice goes to a 35 mm camera as it has to be able to use a wide angle lens (to cover the full Analemma) and to be able to take multiple exposures on the same frame of film.
I have used a Nikon FE SLR camera. It also has the advantage of being capable of being fitted with a motor drive (MD12). This drive allows the camera to be remotely controlled. As the batteries (8 x AA size batteries) would not last a full year, I built a power adapter that fits the battery compartment and is powered by a 12 volt power pack.
In order not to have to be present 40 times at the very right time, I wrote GBasic program that would trigger the camera on the chosen dates and at the right time. More on that program in the paragraph 4.4.
Forty frames are normally enough to show the Analemma. Two tables show when to take those 40 photos. It should be noted that to create 'almost' equal spacings between the photos, the gaps on the calendar are not equal: this is due to the variation of the speed of change of the Equation of Time.
The tables are available here:
Table for Leap Year
Table for non-leap year
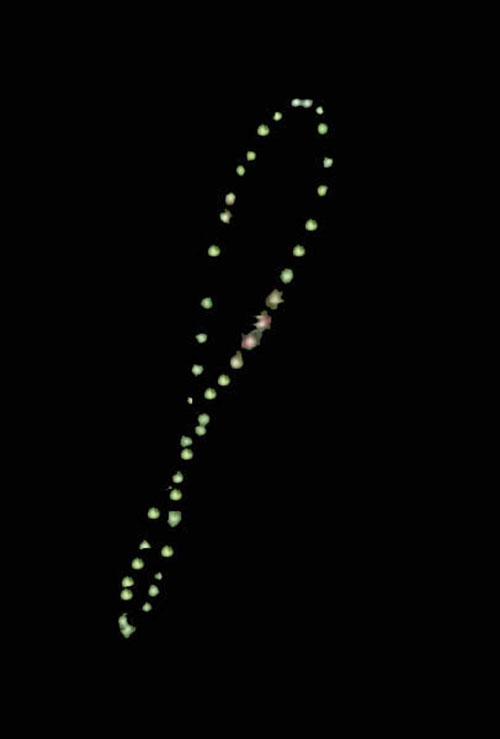

4.3. Digital camera
The next step is to use a digital camera. That takes away from the processing of the film, of mixing chemicals, etc.
But, as digital cameras do not do multiple exposures but a series of single exposures, these (40 of them) will have to be 'joined' together. One way is to use the layers of some graphic programs but this is not simple. Fortunately, there are programs that do this job of 'stacking' those multiple exposures into one only image. Several programs can do that rather easily:
www.startrails.de
www.markus-enzweiler.de/software/software.html
I use a Canon EOS 400D, digital SLR camera. My settings have been:
ISO = 200
f4
1/200 sec exposure
I take 40 exposures throughout the year. See the yearly tables.
Table for Leap Year
Table for non-leap year
Another advantage of using a digital camera compared to a film camera is that each picture can be downloaded and viewed at any time. Also a gap of one or two photos (overcast sky) is not as bad as when one has only 40 photos. It would just create a small gap whitout picture.
With a film camera, one would have to wait for the year to end before being able to view any of the pictures. Also, with a digital camera, one can create a 'progressive' stack of the 'progress so far'.
That is what I plan to do in 2013-2014 with my first 'digital Analemma', producing and publishing a 'progress so far' on a monthly basis starting in November 2013. Watch this space...
More to come...
But one must remember that most digital cameras have a 'reduced' size sensor and with the same lens will cover a narrower field than it would with a 'film camera'.
For more, consult Wlkipedia at: wikipedia.org/wiki/Digital_cameras#Sensor_size_and_angle_of_view

4.4. Software
In order not to be present every time a photo had to be taken, I wrote a short GWBasic program to trigger the camera at the right time and on the right days. I could only use a parallel port to interface the computer to the camera. The interfacing was done by using a Kemo M125 Module.
www.kemo-electronic.com
Other similar modules/interface cards could also be used. Here are a few examples of similar interfaces:
www.sunrom.com/156
www.cnc4pc.com/Store/osc/product_info.php?products_id=47
The output of the interface triggers a 12 volt relay that in its turn triggers the camera. The parallel port is much easier to program than the USB port. I used GWBasic which is also very simple to write.
The program reads the date and the time from the computer and when both date and time are right, a signal is sent to the port through the proper address:
Decimal: 888
Hex: 378h
The line reads: Out 888,1
This triggers the camera and takes the photo.
Then a delay of one second is introduced and all bits are reset to zero, simulating the finger on the camera button, pressing and then letting go by sending the signal:
Out 888,0
Due to the orientation of my camera and in order to have the full Analemma in the camera frame, I calculated that the photos had to be taken at 12:40 local time. As GWBasic counts the seconds from midnight in the '$time' string, 12:40 would be 45600 seconds after midnight. For the days the photos have to be taken, I used the list as per the tables given elsewhere. The intervals between the days for those 40 photos are not equal in order to have the intervals roughly equal on the photos. This is due to the variations around the ecliptic.
The program is listed here:
ana10.pdf
In a variation of the program, a picture of the sun is also taken on a daily basis on a second EOS camera, independently of the original 40 pictures.

This is a recap of all the links previously mentioned:
www.heavens-above.com
The best Site for any prevision.
www.worldtimezone.com/
Time zones and their center meridians.
www.markus-enzweiler.de/software/software.html
Stacking software.
www.startrails.de
Stacking software.
www.kemo-electronic.com
Source of the M125 parallel port module.
www.sunrom.com/156
Another parallele port module.
www.cnc4pc.com/Store/osc/product_info.php?products_id=47
Another parallel port module.
And finally, the ultimate e-book on the subject is:
http://philhart.com/shooting-stars
A search on Google and on Wikipedia will bring a mass of useful information.
 |
Analemma of the Sun (Southern Hemisphere) |
 |
Analemma of the Sun (Northern Hemisphere) |
4.1. Sun Dial
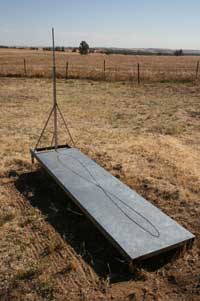
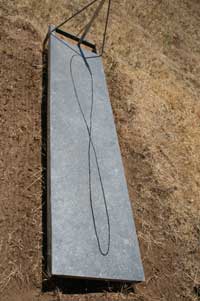
The easiest way to materialize the Analemma is with a sun dial, although it is not a truly photographic method, marking the end of the shadow of a stall (gnomon) at the same time through the year. The markings do not have to be at regular intervals as long as they can be linked by a curve.
 |
 |
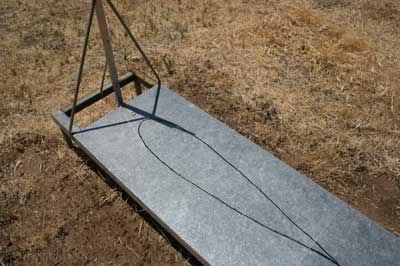 |
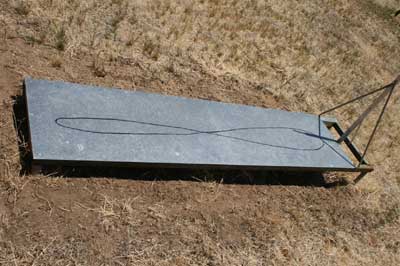 The Sun Dial showing the shadow on October 30th
(Southern hemisphere). |
With the Sun dial oriented North-South, the Analemma should be centered on the board. Depending of the longitude of the observation place, one has to calculate the time where the observation must be made. Indeed, within a time zone, all clocks should show the same time, but the 'Sun Time' or Local Mean Time (LMT) will be different at each longitude.
To get the LMT of a place one must know its longitude. For every 1° one is West of the time zone 'standard longitude', add 4 minutes to LMT to get the standard time. For each 1° East subtract 4 minutes.
The 'zone's standard longitude' is most of the times at the center of the time zone. It can be found on a map on this Site: http://www.worldtimezone.com/
Here is an example of LMT calculation. My longitude is E116°40', the longitude of my time zone (Zone 'Hotel':UTC+8) is E120°.
The difference between the 2 longitudes is:
120°- 116°40' = 3°20'
3° x 4 = 12 minutes
20' x 4 = 80 seconds = 1 minute 20 seconds
Difference = 13 minutes 20 seconds
As my East longitude is West of the standard meridian, I must ADD the difference to the 'Clock' time, therefore to take a picture of the sun at 12 noon (sun time, LMT) the clock should show 12:13:30

Plotting the Sun Analemma with dates around the year (Southern Hemisphere). The horizontal scale is much enlarged. Using this plotting, one can position separate photos along the year. The Equinoxes fall around March 20 and September 20 -22 and the Solstices around June 20-21 and December 21-22 depending of the years.
More details on Wikipedia.
4.2. Film camera
The first photograph of the sun Analemma is attributed to Dennis di Cicco in 1978-1979. The picture was first published in the June 1979 issue of the magazine Sky & Telescope. Since, the legend says that more explorers have walked on the Moon than photographers have succeeded in photographing a full sun Analemma. And also that no one has succeeded in less than 3 years... I must say this is my third year, and probably my final year with a film camera, having finally discovered the advantages of using digital cameras.
It must also be said here that some pictures of sun Analemmas are almost 'too perfect', without any 'misses' and in a perfect shape. It is impossible to imagine that through a full year there will not be some days when the sky is so overcast that the sun is invisible... Also, some Analemmas are shown on some landscape, showing that the pictures had been 'photoshoped' or 'doctored'. As the images of the sun have to be taken with a very dark filter, no sign of any landscape should appear on the final photo unless it is 'added'. To which extend such 'doctoring' should be considered?
A search on Google will show these Analemmas and more.
A rather 'easy' way to photograph the Sun Analemma is to use a film camera. The choice goes to a 35 mm camera as it has to be able to use a wide angle lens (to cover the full Analemma) and to be able to take multiple exposures on the same frame of film.
I have used a Nikon FE SLR camera. It also has the advantage of being capable of being fitted with a motor drive (MD12). This drive allows the camera to be remotely controlled. As the batteries (8 x AA size batteries) would not last a full year, I built a power adapter that fits the battery compartment and is powered by a 12 volt power pack.
In order not to have to be present 40 times at the very right time, I wrote GBasic program that would trigger the camera on the chosen dates and at the right time. More on that program in the paragraph 4.4.
Forty frames are normally enough to show the Analemma. Two tables show when to take those 40 photos. It should be noted that to create 'almost' equal spacings between the photos, the gaps on the calendar are not equal: this is due to the variation of the speed of change of the Equation of Time.

|
Camera Nikon FE, Motor Drive MD11 and the power adapter replacing 8 AA batteries
|
|
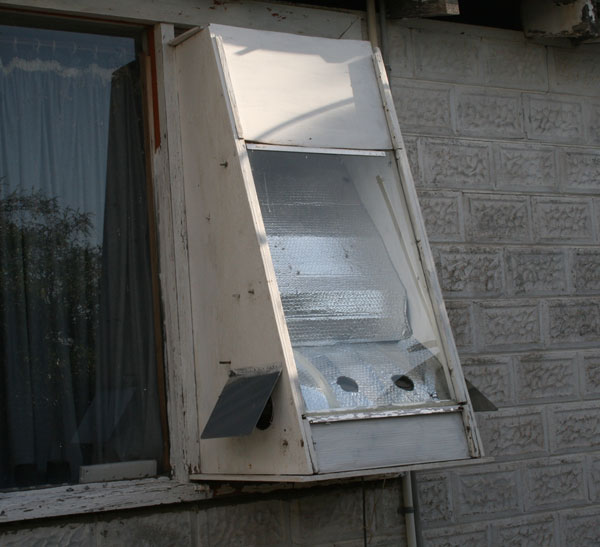
Window box facing the Sun with sloping glass and sun shield to protect the cameras from the heat.
|

|
Inside the window box: on the foreground is the Interface box, the 2 cameras labelled "YELLOW" and "RED".
On the sides are 2 fans to keep the cameras cool in summer.
|
The tables are available here:
Table for Leap Year
Table for non-leap year

Film Analemma:Between November 2012 and November 2013.
Camera: Nikon FE with Motor Drive MD12
Lens: 28mm
Film: Ilford HP5 PLUS 400
Exposure: M250
Aperture: f4
Filter: Mylar sun film glued on a UV filter
Larger photo
Camera: Nikon FE with Motor Drive MD12
Lens: 28mm
Film: Ilford HP5 PLUS 400
Exposure: M250
Aperture: f4
Filter: Mylar sun film glued on a UV filter
Larger photo
4.3. Digital camera
The next step is to use a digital camera. That takes away from the processing of the film, of mixing chemicals, etc.
But, as digital cameras do not do multiple exposures but a series of single exposures, these (40 of them) will have to be 'joined' together. One way is to use the layers of some graphic programs but this is not simple. Fortunately, there are programs that do this job of 'stacking' those multiple exposures into one only image. Several programs can do that rather easily:
www.startrails.de
www.markus-enzweiler.de/software/software.html
I use a Canon EOS 400D, digital SLR camera. My settings have been:
ISO = 200
f4
1/200 sec exposure
I take 40 exposures throughout the year. See the yearly tables.
Table for Leap Year
Table for non-leap year
Another advantage of using a digital camera compared to a film camera is that each picture can be downloaded and viewed at any time. Also a gap of one or two photos (overcast sky) is not as bad as when one has only 40 photos. It would just create a small gap whitout picture.
With a film camera, one would have to wait for the year to end before being able to view any of the pictures. Also, with a digital camera, one can create a 'progressive' stack of the 'progress so far'.
That is what I plan to do in 2013-2014 with my first 'digital Analemma', producing and publishing a 'progress so far' on a monthly basis starting in November 2013. Watch this space...
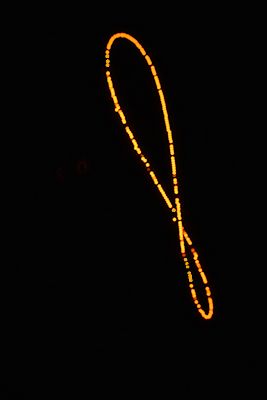
Camera 1
(yellow) from November 11 to November 12 |
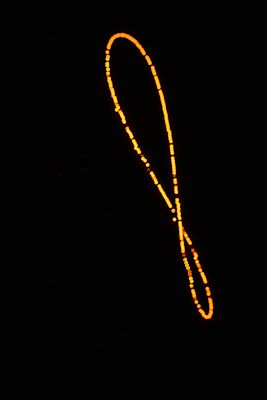
Camera 2
(red) from November 11 to November 12 |
More to come...
But one must remember that most digital cameras have a 'reduced' size sensor and with the same lens will cover a narrower field than it would with a 'film camera'.
For more, consult Wlkipedia at: wikipedia.org/wiki/Digital_cameras#Sensor_size_and_angle_of_view
4.4. Software
In order not to be present every time a photo had to be taken, I wrote a short GWBasic program to trigger the camera at the right time and on the right days. I could only use a parallel port to interface the computer to the camera. The interfacing was done by using a Kemo M125 Module.
www.kemo-electronic.com
Other similar modules/interface cards could also be used. Here are a few examples of similar interfaces:
www.sunrom.com/156
www.cnc4pc.com/Store/osc/product_info.php?products_id=47
The output of the interface triggers a 12 volt relay that in its turn triggers the camera. The parallel port is much easier to program than the USB port. I used GWBasic which is also very simple to write.
The program reads the date and the time from the computer and when both date and time are right, a signal is sent to the port through the proper address:
Decimal: 888
Hex: 378h
The line reads: Out 888,1
This triggers the camera and takes the photo.
Then a delay of one second is introduced and all bits are reset to zero, simulating the finger on the camera button, pressing and then letting go by sending the signal:
Out 888,0
Due to the orientation of my camera and in order to have the full Analemma in the camera frame, I calculated that the photos had to be taken at 12:40 local time. As GWBasic counts the seconds from midnight in the '$time' string, 12:40 would be 45600 seconds after midnight. For the days the photos have to be taken, I used the list as per the tables given elsewhere. The intervals between the days for those 40 photos are not equal in order to have the intervals roughly equal on the photos. This is due to the variations around the ecliptic.
The program is listed here:
ana10.pdf
In a variation of the program, a picture of the sun is also taken on a daily basis on a second EOS camera, independently of the original 40 pictures.
5. LINKS
This is a recap of all the links previously mentioned:
www.heavens-above.com
The best Site for any prevision.
www.worldtimezone.com/
Time zones and their center meridians.
www.markus-enzweiler.de/software/software.html
Stacking software.
www.startrails.de
Stacking software.
www.kemo-electronic.com
Source of the M125 parallel port module.
www.sunrom.com/156
Another parallele port module.
www.cnc4pc.com/Store/osc/product_info.php?products_id=47
Another parallel port module.
And finally, the ultimate e-book on the subject is:
http://philhart.com/shooting-stars
| INTRO | IRIDIUM FLARES | STAR TRAILS | ISS | SUN ANALEMMA | LINKS | GALLERY | BACK TO ESCRITURES |